
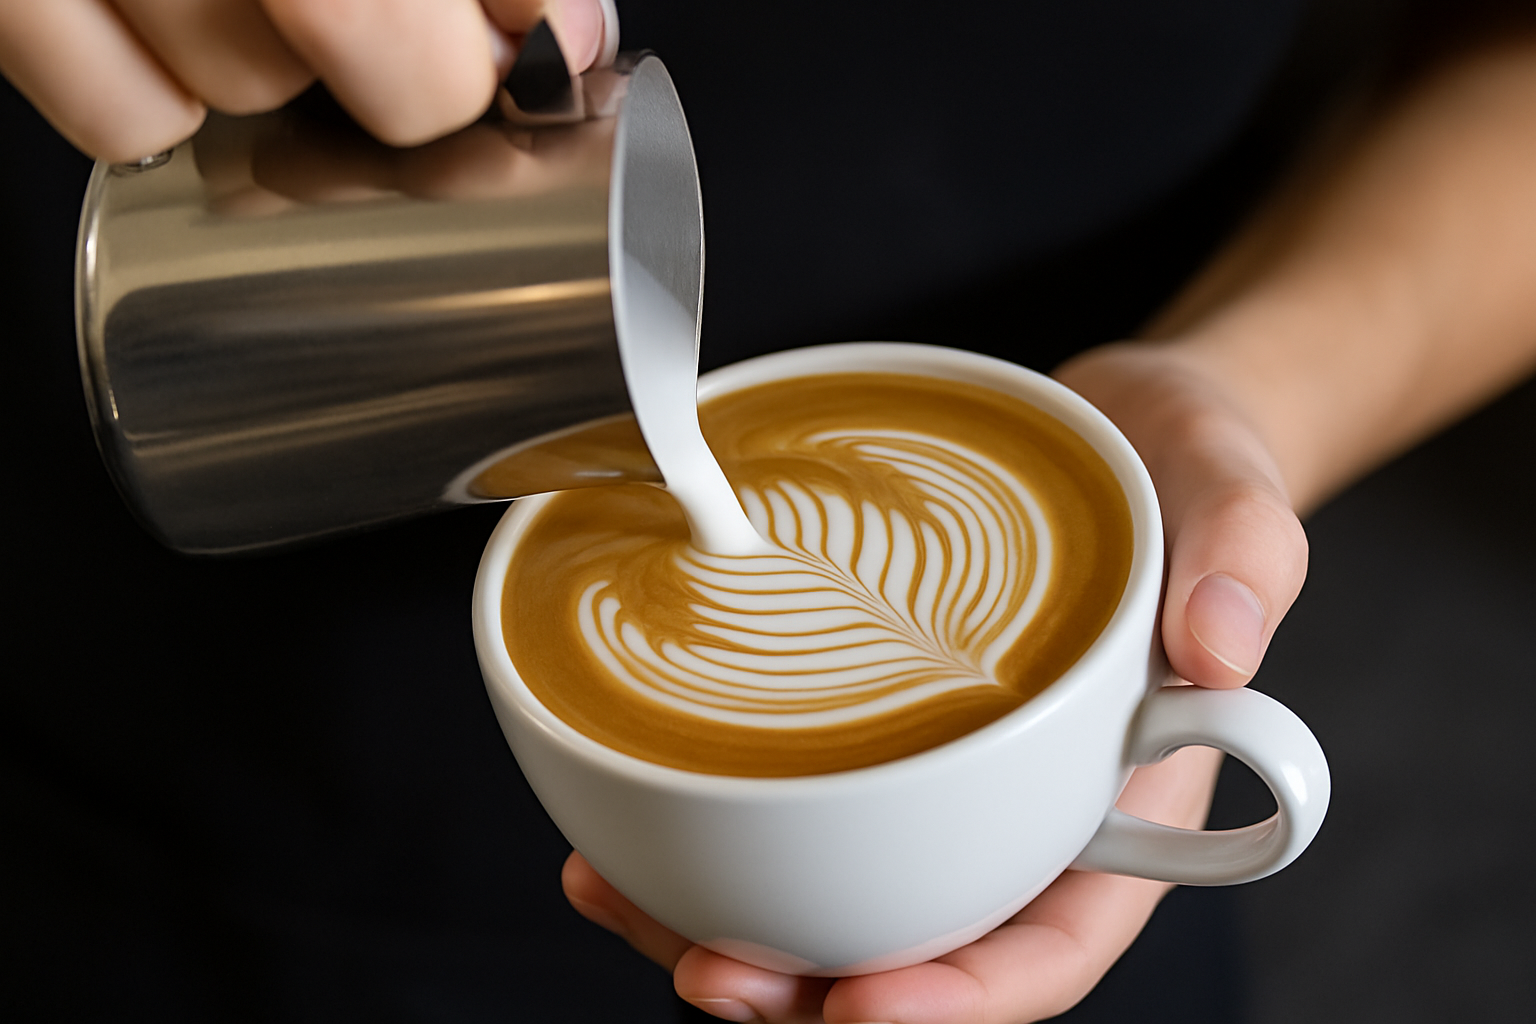
The rosetta is one of the most iconic and elegant latte art designs.
Its leaf-like pattern, formed by a series of wavy motions and a smooth draw-through, requires a delicate blend of control, rhythm, milk texture, and flow.
While it may appear complicated, the rosetta is achievable with practice and technique — and it becomes a defining skill for baristas aiming for professional-level presentation.
In this comprehensive guide, you’ll learn exactly how to pour a rosetta that’s symmetrical, well-structured, and high in contrast.
We’ll explore each element that contributes to its clarity and flow — from steaming the perfect microfoam to understanding how motion and timing affect each leaf. By the end, you’ll not only be able to pour a rosetta — you’ll understand what makes one great.
What Makes the Rosetta Unique?
The rosetta mimics the shape of a fern or a leaf with evenly spaced “leaves” growing out of a central stem. It’s created in motion, unlike the heart or tulip, which rely on static pushes.
A good rosetta should have:
- Sharp contrast between milk foam and crema
- Even, symmetrical leaves on both sides
- A centered stem running top to bottom
- A clear and confident finish
What makes it challenging is the combination of movement, flow control, and speed. It’s not just about pouring well — it’s about pouring rhythmically.
The Foundation: Preparing the Perfect Espresso and Milk
Before you pour a single drop, both your espresso and milk need to be perfect.
Pull a Clean Espresso Shot
Use fresh coffee roasted within the last two weeks. Your crema should be thick and golden with no holes or broken spots. Pull the shot just before pouring — crema fades fast. A strong crema is essential because the rosetta sits on top of it, not within it.
Steam Milk to the Ideal Texture
The milk for a rosetta must be smooth and silky, with a consistency similar to wet paint or melted ice cream.
Start with cold whole milk. Introduce air for only one to two seconds, then submerge the steam wand and create a vortex to evenly texture the milk. Heat to 60–65°C. Once finished, swirl and tap the pitcher to maintain consistency. There should be no visible bubbles — just liquid velvet.
How to Pour a Rosetta: Step-by-Step
Tilt the Cup Toward You
Hold the cup at a 20–30° angle. This helps the milk settle in the base and gives you more control when forming the leaves. Hold the cup in your non-dominant hand and keep it steady.
Start the Base Pour
Begin pouring from about 6–8 cm above the cup. Pour a thin stream of milk into the center of the espresso. This step mixes the milk and crema, creates a uniform color, and fills the cup to about half full. It lays the foundation for the design.
Drop the Pitcher and Begin Wiggle Motion
Lower your pitcher to about 1–2 cm above the surface of the crema. Increase your flow slightly and begin a gentle side-to-side wiggle while slowly pulling the pitcher backward. Wiggle with your wrist, not your whole arm. Keep the motion consistent — like a gentle wave. The leaves should be evenly spaced and symmetrical.
Continue the Wiggle Until the Cup is ¾ Full
As you move the pitcher back, continue the wiggle motion for as many leaves as you can fit — usually 6 to 12 depending on cup size. Smaller wiggles will create thinner, more detailed leaves, while wider ones give a bold appearance. The milk should gently push the design forward without flooding the cup.
Stop the Wiggle and Pull Through
When you reach the back of the cup, pause the wiggle. Lift the pitcher slightly and pull a thin stream forward through the center of the leaves. This creates the stem and finalizes the rosetta. Make sure the draw-through is straight, centered, and light enough to avoid disrupting the shape.
Common Rosetta Mistakes and How to Fix Them
If your rosetta looks like a blob, you may be pouring too fast or using milk that’s too thick. Slow down and ensure your milk is smoother and better textured.
If your leaves are broken or uneven, it’s likely due to an inconsistent wiggle motion. Practice steady wrist movements and avoid jerking the pitcher.
If your rosetta is off-center, you’re likely drifting your pour or tilting the cup incorrectly. Align your body with the cup and keep your movement straight along the centerline.
If the leaves merge or collapse, your pitcher may be too high during the wiggle phase. Stay close to the crema surface when drawing the leaves.
If the final line ruins the shape, you may be pouring too fast or too deep. Lift the pitcher slightly and pour gently through the center to maintain clarity.
Tips for Practicing Your Rosetta
Practice the wiggle motion without pouring. Use your wrist to mimic the side-to-side movement. Consistent muscle memory will help you create even leaves.
Use water and dish soap to simulate milk texture while you practice. Focus on your motion and control without worrying about wasting coffee or milk.
Draw a center line on your practice cup with a marker. This visual guide can help keep your pour straight and symmetrical.
Focus on your wrist, not your elbow. The finer your control, the sharper your design.
Advanced Rosetta Variations
Once you’ve mastered the basic rosetta, try exploring creative variations.
The Double Rosetta involves pouring one full rosetta and starting another behind it, then pulling a shared draw-through. The Rosetta-Tulip Hybrid begins with a tulip base and finishes with a rosetta, combining sharp structure with layered depth. The Winged Rosetta involves wider wiggles that spread the leaves outward, giving a more dynamic and bold look. The Reverse Rosetta starts at the back of the cup and wiggles toward the front, creating a mirrored effect.
Troubleshooting Based on Cup Size
In small cups (4–6 oz), use tight wiggles, fewer leaves, and focus on crisp contrast. In large cups (8–12 oz), you can add more leaves with wider wiggles, but be careful to maintain milk flow and avoid flooding.
Final Thoughts: Rosetta as a Skill and Signature
The rosetta is more than a beautiful design — it’s a test of flow, form, and focus. It reflects your ability to manage every variable: espresso, milk, pitcher control, and motion. Mastering the rosetta shows you can build a design in motion, not just drop foam onto coffee.
Be patient. Pour slowly. Watch each leaf form. Every pour teaches you something — whether it’s a victory or a mistake. And with repetition, your rosettas will evolve from shaky first tries to impressive, elegant signatures of your barista journey.

Marcelo Rodrigues is a passionate barista with over 7 years of experience in specialty coffee. He’s worked in top cafés, led barista training sessions, and now shares practical tips to help beginners and coffee lovers improve their skills. Through this blog, Marcel makes the world of coffee more accessible—one cup at a time.